We are very happy to introduce our Hardwood Flooring Information and Installation Guidelines. Following our recommendations will greatly reduce your call backs, and lessen the number of unhappy customers.
Walking the tight rope on every job is not necessary. Simply following our guidelines and passing on the valuable information to your new homeowner will greatly reduce your risk of falling.
Greg and I are certified NWFA Floor Inspectors. When people have an issue with their hardwood flooring (not purchased from Gaylord) they visit www.nwfa.org and contact an inspector in their area. They will contact Greg or myself, and want us to perform an inspection. Being busy running our business, we usually listen to the concerns and explain to them that their issue is normal. We tell them how to correct the situation; and the people thank us. However, occasionally people want a full report; in which case we charge between $700 and $1000. We create a report, compiling all of the contributing scientific facts relating to the issue. If the customer escalates the situation and it turns into legal action, we become the “Expert Witness” and our report is very important.
However, when we have an issue with one of our own floors and explain the same information to builders and homeowners, it is not accepted with the same credibility as the independent inspections we do, which is not fair to us. How can we go from the “Expert Witness” status, to the person that isn’t trusted because it is their product? My point is: the advice we give is very professional and doesn’t change, whether it is or isn’t our hardwood flooring.
We take what we do very seriously and are always upgrading our knowledge base. It is basic simple science. The information is very clear and we are very willing to answer any questions that arise. If you are a builder who is switching to laminate because you are having too many issues with hardwood, it is very likely that you are not following our recommendations. NWFA statistics show that 78% of problems are in newly constructed homes in which 95% are moisture related. The simple solution is to follow our recommendations to get through the new home stage. Laminate is a very short term solution while hardwood will last over 100 years.
Unfortunately, most people selling hardwood flooring are unable to give the necessary professional advice and whenever there is an issue, they pass the problems back to the distributor, who passes them back to the manufacturer and nobody takes the responsibility; you are left with the problem.
Our goal is to produce the best possible product, manufactured within very strict tolerances; above and beyond industry and Tarion standards. At Gaylord, there is a great feeling of pride putting our name on a product that was manufactured and installed by your team. This manual will demonstrate how committed we are in what we do. Please look at us as a partner and professional flooring consultants who will make your job easier and more profitable.
At Gaylord’s your order is specially made for you, so the measure is very important. When the customer performs the site measure, there will be “No Returns”, plus a $350 set up fee if you run short and need more material. Measure the exact footage and add on the recommended waste for the job. The waste factor will be affected by the product used, as well as the size of the rooms. Large rooms create less waste than small rooms; hallways create more waste. Patterns and running on angles create more waste, as well. Please ask, and we will assist you with any questions regarding the waste. If you are having a Gaylord Professional Install we take the measure worry away and are completely responsible.
Every Hardwood Floor is Custom Made
The square footage on your order is the target number we shoot for during production. This footage will likely change, as we put extra material on the production line to accommodate for pieces that don’t pass our strict quality control process. This extra material will not exceed your original order by more than 2%. Most competitors will suggest adding a waste factor of 10% instead of our normal 5%. In a case where you have material left over, instead of being upset you must realize that you had less waste because of our superior quality. Had you gone with a competitor, you would have had to purchase much more material and possibly run short. It is not fair to punish us for having a great product with less waste.
Often times, closets and landings will be forgotten. As we know, many changes can occur with a floor plan; customers use tile instead of hardwood or vice versa; areas get larger or smaller. When this happens, we need to be notified BEFORE the flooring is produced. Be sure to install the main most visual areas of the house first, leaving the closets to the end, in case you do not have enough material. Wood is a natural product and may vary from one batch to another, so running out in a very visual area creates a reason for the customer to not be happy, as the new boards may not be a perfect match. If you feel you may run out, do not use your last box until you get the new material. This way the new material can be feathered in with the existing floor, making it less noticeable.
The Importance of Ordering Slightly More Hardwood Flooring
Having an extra box of flooring available for future repairs is a good idea. Most damage to hardwood flooring occurs during the construction and move-in stage. Be sure dishwasher, fridge and washing machine hoses are securely fastened to prevent water leaks that will cause severe damage.
At the time of the site measure, please include any accessory pieces (bullnose, reducers, T-moulds, spline) as well as the number and sizes of vents; they are all custom made for the job. Vents ordered with the flooring will be finished on the line to be an exact match to the flooring. Vents ordered after the flooring is produced will be finished by hand and will not be perfect. Having all of the material at the jobsite at the same time will prevent unnecessary delays in completing the installation.
Accurate Flooring Measurements Ensure a Smooth Installation
Please take the time to make an accurate measure, including all material needed for the job. We make enough material for the job and very seldom have extra material. Producing another box of flooring can take up to two weeks, while doing it the first time takes an additional 2 minutes; not to mention all of the stress created and wasted time.
When the measure is wrong and more flooring is needed, the installer who did the measurement usually does not accept the responsibility and quickly blames the quality of the wood such as: we shipped less product than we billed for, as the reason for running out which is very unfair to our company. When this happens we quickly go to the house and do a measure and in most cases the original measure was incorrect. We want to avoid this as it causes unnecessary stress www.gaylordhardwoodflooring.com Rev 02.14 between the homeowner, installer and ourselves. If a third party person is doing the measure, be sure to stress the importance of the measure and make them responsible. If visiting our showroom ask for a complimentary calculator.
Each floor is custom made for the individual customer so we want to get it right the first time and have everybody happy.
Thank you for choosing Gaylord. The success of your job is very important to us. If you have any questions please contact us at info@gaylordhardwoodflooring.com
Here is a link to our video “Measure Twice, Order Once”: Click Her
Recently I was fortunate enough to attend a National Wood Flooring Association seminar entitled “Understanding Relative Humidity in Your Home”. The seminar was very informative and I will share the information with you.
Being in the Northeast Region, we are exposed to extremely cold dry winters and very humid summers. Without any humidity control, the same house with extreme spaces between the boards in the heating season, could become cupped in the high humidity of the summer.
Water vapor is a gas, it will fill any space; however, other forces such as air movement, due to temperature stratification, have a strong effect on the dispersion of humidity. Normal living conditions are considered 65-75 degrees Fahrenheit (18-24 C) with a relative humidity between 30-50%. This is the range that is best for your health which is also best for your wood flooring.
The Optimal Humidity Level for Human Health
The Human Health chart, pictured below, clearly shows the effects of below 30% and above 50% Relative Humidity for bacteria, viruses, respiratory infections, allergic rhinitis and asthma problems. If you have pets, and let your RH get above 50%, it is almost certain that you will have dust mites. Although not visible they are there feeding daily on flakes of skin from humans and pets.
Signs of dust mites include sneezing, runny nose, and signs of asthma such as wheezing and difficulty breathing. They cannot exist in humidity levels below 50%. A study in 2000 found that more than 45% of American homes had detectable dust mite levels associated with the development of allergies, and 23% had bedding with concentrations of allergens high enough to trigger asthma attacks. I am getting itchy just thinking about these creatures.
In the past, I was only concerned with the humidity levels inside the home because that is where our product would be, I just assumed the outside air came inside and became inside air. What I did not realize was the amazing effect temperature has on humidity and as a result, hardwood flooring. The upcoming illustrations will make this much easier to understand.
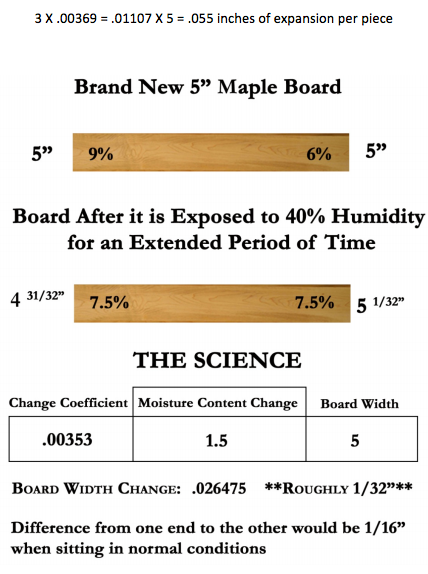
When the Air is Too Dry for Hardwood Flooring
The below slide is a typical winter day with an outside temperature of 10 F (-12 C) and RH of 70%. When this air enters the house and is heated to 70 F (21 C) the RH drops to a shocking 6%. As I am writing this article I see the outside temperature is -11 F (-24 C) which would make the RH of the reheated air almost nothing. As the temperature drops your heating system is running more frequently which makes it impossible to keep your humidity between our 30-50% without adding moisture to the environment.
Long stretches of cold weather and not adding moisture back into the house is not only damaging to your solid or engineered hardwood flooring but it effects all wood products and any wood products attached to them such as crown moulding, baseboard, countertops, cabinet doors, etc.
Examples of When Hardwood Flooring is Too Dry
Removing nearly all the moisture from the wood can stress the wood beyond its limitations especially the poor quality engineered wood manufactured offshore. Some situations where boards have shrunk and developed spaces will correct themselves when moisture is added back into the home.
Other issues such as cracks in the boards or caulking that has separated will not usually correct themselves. When manufacturing our products, we must consider the movement of the wood as well as the movement of the finish. With our engineered flooring we must consider three products that must move together, the plywood, the wood and the finish. Inside the 30-50% RH normal minor issues may occur, but the further outside of the preferred RH range the more problems are almost certain to occur. Wood will behave like wood.
When the Air is Too Humid for Hardwood Flooring
We have spent most of our time talking about cold air being heated and RH dropping. When warm humid air is cooled the RH rises 2.2% for each 1 degree Fahrenheit. In a crawl space, the moisture comes from two sources; the ground and the outside air. The soil will wick moisture, through capillary action, from moist to dry areas. Water does very little to ruin a home with a dirt crawl space as it seldom touches any of the joists, sill plates, girders or insulation. It is the water vapor that causes the wood to mold and rot. Condensation makes everything wet which will stimulate mold to grow and wood to rot.
Crawl Spaces and the Effect on your Home
Crawl spaces are typically dark, damp and cool. We will look at an example of a typical summer day in the Northeastern region. Outside air at 80F degrees with a RH of 70% enters into a 64F crawl space. Let’s look at the numbers. 80F- 64F=16 x 2.2=35.2% rise in humidity; 70% plus 35.3%= 105.3% RH. We can’t have over 100% humidity because the air can’t hold more than 100% as it has reached its capacity. This air will then condense on the cold surfaces causing the air to give up its moisture as the relative humidity has reached its capacity to hold moisture. Condensation will form on the heating/cooling ducts, the water pipes, the block walls, the joists and the bottom of subfloor. The moisture in the subfloor will migrate up into the hardwood flooring causing it to cup, crack and sometimes buckle.
I have used a crawl space as the example but it is similar in basements if the conditions are created. Quite often people open basement windows to get rid of the stale air. With the same outside conditions as the above example (80 degrees F and 70% RH) with a basement temperature of 70F and RH of 40% here is what happens when not factoring in the higher outside humidity coming in: 80F-70F=10 x 2.2=22.2% rise in RH which will bring the new RH to 62% which is out of our recommended range. If you notice a smell in your basement or on things stored in your basement you most likely have a moisture problem. I suggest getting it under control by closing your basement windows and operating an appropriate size dehumidifier to remove this moisture; also there is a Humidex system that I am researching that seems quite simple and the company claims it will do a better job than a dehumidifier and would be less expensive to operate. Getting the humidity under control will lessen the odours.
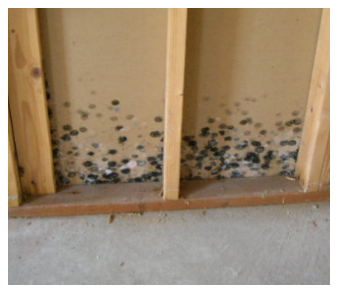
In the above picture the mold was not visible until the drywall was removed from the wall. In a new home the concrete will release moisture for 1.5 to 2 years. This picture illustrates how the wood has absorbed the moisture from the concrete and drawn it up into the space. With this additional moisture and no air movement, the mold thrives.
The below chart shows how many gallows of water are needed to be added to a home in order to maintain the minimum 30% relative humidity at 75o F (24o C). Tight homes are new homes that are built with today’s standards.
You likely don’t go down into your crawlspace unless you absolutely have to because of the damp musty smell. If you think that by shutting the door you have left that environment behind you are terribly wrong; due to the “Stack Effect” up to 50% of the air you breathe in your home comes from the crawl space.
The circulation in your home allows for up to 70% of the air you breathe to come from the basement. If your basement has a musty smell, this is not healthy to breathe as the health chart (discussed earlier) indicates. The musty smell is the result of the off gassing of the developing mold.
As the above chart indicates, the higher the quality of your windows, the less heat loss and condensation you will have.
Relative Humidity and Hardwood Flooring Summary
Wood shrinks when exposed to low humidity and expands when exposed to high humidity. In the Northeastern Region we have very dry winters and humid summers, so it is important to control the humidity through humidification and dehumidification in order to keep yourself and your floors healthy.
Damp air takes more energy to heat and cool, so spending money to get rid of the dampness in a crawl space or basement will pay for itself not to mention the health benefits that can’t be measured.
Engineered flooring handles high humidity better than solid hardwood but fails when exposed to dry conditions more than solid. Solid will shrink as a whole, while the top layer of solid wood on the engineered will shrink more than the plywood base causing the surface layer to crack.
Much of the air that you breathe is coming from your crawl space or basement. Odors and mold activity in the crawl space or basement are warning signs that your entire home may be making you sick.
The amount of moisture the air can hold increases as the temperature rises and decreases as the temperature cools. During the heating season with long stretches of cold temperatures, not adding humidity to your home will be harmful to your health as well as your floor. Please watch our Heat Recovery Ventilation video: https://youtu.be/lXAmshK9OtM
Window panes are usually the coldest surfaces in your home, which is where condensation will appear first. As the chart shows, lower quality windows with high heat loss are the first to show condensation. High quality windows will show condensation at much lower temperature due to less heat loss.
Solid wood flooring will perform best when the interior environment is controlled to stay within a relative humidity range of 30% to 50% and a temperature range between 16 and 25 degrees Celsius. Engineered wood flooring will perform best when the interior environment is controlled to within a relative humidity range of 35% to 55% and a temperature range between 16 and 25 Celsius. Fortunately, that’s the same range most humans enjoy. The chart below indicates the moisture content that wood will likely have with long term exposure to any given temperature and humidity. Note that the equilibrium moisture contents in the recommended temperature/humidity range (shaded area) coincide with the 6% to 9% range in which we manufacture our hardwood flooring. Although some movement can be expected even between 6% and 9%, wood can expand and shrink dramatically outside of that range.
As mentioned above hardwood flooring enjoys the same humidity conditions as humans. New homes are built to be energy efficient and as a result become too air tight. Homeowners do not know how to operate and maintain the mechanical systems causing bad air in the house. Breathing problems are one of the main reasons for visits to Hospital Emergency Rooms in North America. As you can see on the “Humidity and your Health” chart below it is ideal for health purposes to keep humidity levels as close to 40% as possible. If you have pets and your humidity is above 50% it is almost guaranteed you have dust mites in your home. If you or your family seem to always have colds in the winter months it is likely caused from the low humidity and quality of air in your home.
The Science Behind Wood Movement
Understanding that solid wood moves 50 times more widthwise than it will lengthwise, going lengthwise into tile is not an issue; however widthwise it is very important.
The numbers on the accompanying chart reflect the dimensional change coefficient for various species, measured as tangential shrinkage or swelling within normal moisture content limits.
The dimensional change coefficient can be used to calculate expected shrinking or swelling. Simply multiply the change in moisture content by the change coefficient, and then multiply by the width of the board. Example: A red oak (Change coefficient .00369) board 5” wide experiences a moisture change from 6% to 9% - a change of 3 percentage points.
Growing Hardwood Flooring Boards
How much can temperature and humidity affect the dimensions of a hardwood floor? Take a look at the same 5” oak board.
Within “Normal Living Conditions” (say, an interior temperature of 70 degrees and a relative humidity of 40%), the board has a moisture content of 7.7 % and is 5” wide.
If the relative humidity falls to 20%, the moisture content of the board will be 4.5%, and the same 5” board will shrink by .0059” (thickness of a toonie). Across 10 feet of flooring, that could translate to as much as 1.4” of shrinkage.
If the humidity rises to 65%, the board’s moisture content would be 12% and the same 5” board would expand by .079”. Across 10’ of flooring, this could translate to 1.9” of expansion which would likely cause severe cupping.
Evaluate the jobsite for potential problems before installation begins, and before wood flooring is delivered to the jobsite; taking pictures of unacceptable jobsite conditions, recording humidity levels and moisture contents of subfloor throughout the installation.
Upon failed site conditions; Gaylord Hardwood Flooring will require a signed waiver form indicating failed conditions before proceeding with delivery and/or installation. Gaylord Hardwood Flooring accepts no responsibility for any future hardwood issues related to failed jobsite conditions. This includes the ambient temperature and relative humidity at the time of installation and all variables that affect the long term success of the job.
Things to do before your hardwood flooring is delivered
Surface drainage should direct away from the building.
Heating, air conditioning, and dehumidification systems must be operating before, during and after the installation. If it is not possible for these permanent systems to be operating, temporary systems must be set up to mimic a temperature of between 65 and 75 degrees Fahrenheit and relative humidity between 30% and 50% for solid wood and between 35% and 55% for engineered wood. Notes: 1. Electric portable heaters excessively dry out the area closest to them. Propane heaters add moisture to the area which can work against already high moisture conditions. Kerosene heaters add an oily film to the floor which makes it more difficult to clean and prevents glue from bonding to concrete.
In new home construction a dehumidifier that removes 8-10 gallons per day is required. Anything less will not remove the moisture quickly enough. The dehumidifier should always be set up in the basement which is the largest source of moisture. It is best to draw the moisture down from the subfloor. I would suggest the dehumidifier be set up as close to the middle of the basement as possible, draining into an enclosed sump hole. A couple of fans blowing towards the dehumidifier will ensure more consistent drying results.
Do not deliver wood flooring to the jobsite or install wood flooring until these temperature and humidity conditions are achieved and the subfloor is within 2% of the wood flooring. Surface drainage should direct water away from the building. All concrete, masonry, plastering, drywall, texturing and painting must be completed. Note: 1. A newly constructed home may contain more than 1 gallon of water per square foot of home. A 2000 square foot home could have up to 2300 gallons of water; which will be absorbed by the wood flooring if not removed during the construction and newly occupied stages. The quick removal of the majority of this moisture is instrumental to the success of the wood flooring job. As a builder or installer you may have created the perfect conditions (40% relative humidity and a subfloor moisture content within 2% of the hardwood) to proceed with the installation, but you need to understand that the moisture in the walls, concrete etc. will be absorbed by the air; and subsequently by the subfloor and wood flooring. Without continued removal of this moisture, these perfect conditions will quickly deteriorate, resulting in a problem floor in the future.
Is it realistic to think these subfloors will be within 2% of the wood flooring without operating a dehumidifier?
BASEMENT CEILINGS MUST NOT BE FINISHED UNTIL THE SUBFLOOR AND JOISTS ARE WITHIN 2% MOISTURE CONTENT OF THE HARDWOOD FLOORING. If the moisture is not removed, it remains trapped between the subfloor and basement ceiling; causing the hardwood floor to cup and crack over the long term. With little or no air flow, the trapped moisture is drawn upwards to the drier hardwood floor. This process is very slow and can take 3 years or more, as the moisture has to travel through the underlayment, the wood flooring, and the finish to exit.
Basements and crawl spaces must be dry. Crawl spaces should be a minimum of 18” from the ground to the underside of the joists. Crawl space earth (or thin concrete slab) should be covered 100% by avapour retarder of black polyethylene (minimum 6 mil) overlapping a minimum of 6”. There are many variations of crawl space conditions. Please don’t hesitate to contact us with any questions.
Ensure that the flooring selected is suitable for the grade level. Solid hardwood flooring can be installed on-grade and above-grade only on a wood-based subfloor. Engineered hardwood can be installed above-grade, on-grade and below-grade over wood-based subfloor and concrete.
Radiant heating systems must be on and running for at least 7 days prior to installation. Moisture test of the concrete must be taken. For more info please contact us at info@gaylordhardwoodflooring.com.
The point of acclimating wood flooring prior to installation is to allow the moisture content of the wood to adjust to “NORMAL LIVING CONDITIONS” at the site; that is, the temperature and humidity conditions that will typically be experienced once the new home moisture is removed and the structure is occupied. We manufacture our hardwood flooring to a moisture content between 6% and 9%. Going from the temperature and humidity chart (in Chapter 3), 40% humidity creates a wood moisture content of 7.7% which is in the centre of the range. In the North Eastern Region, where we are located, is the centre of the range that a house should be in after the “new home” moisture is removed. Other regions may require periods of acclimation to bring the wood within 2% of the subflooring. Our warehouse is climate controlled to a relative humidity as close to 40% as possible. This range is the most comfortable and healthy for humans. In most cases, our flooring is ready to install immediately after delivery. If your home is within this range the wood is going to remain the same whether it is in our temperature controlled warehouse or in your home. Our climate, in the Northeast, is very dry in the winter and very humid in the summer. When flooring is acclimated too long in the extreme dry winter conditions and installed when it has shrunk, it will expand excessively and possibly cup when the humid season arrives. If the flooring is acclimated to high humidity conditions and installed when it is expanded when the dry season returns the floor will shrink excessively resulting in large spaces between boards. If you have a cottage that is not heated in the winter, a crawl space, a structure on piers, or any situation that may not be considered normal, please contact us at info@gaylordhardwoodflooring.com. It must be understood that the wood based subfloor must be within 2% moisture content of the hardwood flooring before installation can proceed.
Having the wood flooring on the jobsite before these conditions are met will cause it to change dimensions, especially on the ends. If the humidity is higher than the recommended levels, the ends of the wood will absorb moisture first and will become wider. If the humidity levels are lower than the recommended levels, in solid wood the ends will lose moisture and shrink; for engineered flooring the top layer of wood will crack. In both of these cases problems are created unnecessarily.
Acclimation is very misunderstood. Many times I have come into situations where someone was adamant that the wood flooring needed to sit in the house 2 to 3 weeks prior to installation to acclimate. This was true ages ago, before the wood was kiln dried; the flooring had to sit in the house to complete the drying process.
Moisture meters and humidistats are the most critical tools of the trade. If your installer does not have either of these tools, they are obviously not aware of the very important relationship between wood and moisture. Continuing with an install constitutes acceptance of the jobsite conditions by the installer.
The wood based subfloor must be within 2% moisture content of the hardwood flooring. The relative humidity of the home must be between 30% and 50% for solid hardwood and 35% and 55% for engineered before, during and after the install. A minimum of 10 moisture readings taken per 500 square feet no closer than 4’ apart recording the highest and lowest measurements.
There are many types and brands of moisture meters. Pin types penetrate into the wood to obtain the moisture reading. Pinless, non-destructive meters obtain moisture readings without penetrating the wood. The pinless meters give a reading which is not necessarily accurate, but offers an approximate reading of the moisture content. The more expensive meters have adjustable settings that are more accurate, but are affected by the glues in the subfloor. The only true method to measure the moisture content of wood is to weigh the piece of wood; dry it until there is no moisture left; weigh the now dry piece; subtract the dry weight from the green weight; and divide by the dry weight. MC = [(initial weight- oven dry weight)/oven dry weight] x 100% for example: 400 grams - 370 grams = 30 grams, divided by 370 grams x 100 = 8.1% moisture content.
Humidistats, or hygrometers, are readily available for purchase. Purchasing and using 2 units will keep accurate results. Take and record these measurements throughout the job.
Before testing a concrete slab it must be at least 45 days old. Use the Calcium Chloride test which is available at the Big Box stores. The moisture level using the calcium chloride must not exceed 3lb/1000 square feet.
The length of time it takes for concrete to cure can create delays on the construction site. A concrete slab or wall in perfect drying conditions with a large dehumidifier operating will dry at approximately 1” per month. Without those conditions the concrete may only dry ¼” per month. Concrete cures by hydration when water reacts with the cement powder, giving concrete its strength. However, the mix always contains more water than the hydration reaction requires. This has become more prevalent with the use of lightweight aggregate, which tends to retain moisture. In typical floor slabs, there could be up to 50 gallons of extra water in every cubic yard of the pour. Using a dehumidifier with constant air flow over the slab surface will speed up the process. When the slab is dry it is recommended to use a concrete sealer or a recommended adhesive with moisture barrier.
Radiant heating in concrete slabs must be turned on to a minimal temperature of 22o C, 7 days prior, in order to drive out residual moisture before wood flooring can be installed.
Since there are many types of radiant heating systems, please contact us for more detailed information for your project at info@gaylordhardwoodflooring.com, or see chapter 12.
Wood subfloors must be flat, clean, dry, structurally sound, free from squeaks and free from protruding fasteners. Especially with dark shiny floors, the slightest amount of variation on a subfloor can make the floor look terribly uneven when light shines on them. For installations using nails/staples 2” and longer, the subfloor should be flat within 1/4” over 10’ or within 3/16” over 6’
IT IS THE BUILDER’S OR GENERAL CONTRACTOR’S RESPONSIBILITY TO SUPPLY THE WOOD FLOORING CONTRACTOR WITH A SUBFLOOR THAT IS WITHIN THE ABOVE TOLERANCES.
If peaks and valleys in the subfloor exceed these tolerances, the high spots can be sanded down and low spots filled with extra underlayment. Not supplying a flat level surface; and installing a shiny smooth floor with natural light, turns into disaster with no repair options, other than a tear-out. The subfloor must be free from all dirt, especially drywall compound drips that prevent the wood flooring from laying flat on the subfloor. The hardwood flooring will only lie as uniformly as the subfloor. If there is movement or squeaks in the subfloor, refasten the subfloor to the joists in problem areas. Protruding fasteners are easily remedied by driving those fasteners deeper into the subfloor.
OSB Subflooring
When OSB subflooring dries it loses its grip on the fastener, which leads to squeaks; especially in areas with high traffic and areas above the main heating system. These squeaks are a major reason for calls from unhappy homeowners who feel it is a failure of the hardwood flooring or a poor installation job. There are many qualities of OSB on the market. In fact most OSB manufacturers have a good, better and best product that are priced accordingly. The higher the quality of the product the less it will absorb the jobsite moisture. The products are rated by a limited “No Sand Warranty” which guarantees how many days the product can sit in the elements and not require the edges to be sanded. Although the advertising shows water lying on these products the warrantees tell a different story. The product must be stored and covered and is not suitable for uses involving long-term exposure to weather. Our warrantee will not accept an OSB product with less than a 180 day No Sand Warranty. If joints have been sanded or need to be sanded on any OSB product our pre-installation warrantee is null and void. We would strongly recommend OSB with a No Sand rating of 365 days and higher as these products are simply more moisture resistant or use CDX Exposure 1 plywood panels. Watch for our new Subfloor comparison test on YouTube.
Ensure proper expansion space (1/8”) between the panels. If the subfloor panels are not tongue and grooved; and there is not sufficient expansion space, use a circular saw to create the specified space. Do not saw through joints on the T & G subfloors.
Check for delaminated or damaged areas and repair those areas as needed.
Ensure the subfloor is free from debris before starting installation.
Acceptable Panel Subfloors: Truss/joist spacing will determine the minimal acceptable thickness of the panel subflooring
On truss/joist spacing of 16” o/c or less, the industry standard for single-panel subflooring is nominal 5/8” CD Exposure 1 Plywood subfloor panels or 25/32” OSB subfloor panels (Minimum 180 Day No Sand Warranty), 4 x 8’ sheets.
On truss/joist spacing of more than 16” o/c, up to 19.2” o/c, the standard is nominal ¾” T & G CD Exposure 1 Plywood subfloor panels (CD Exposure 1), 4’ x 8’ sheets, glued and mechanically fastened; or nominal 3/4” OSB subfloor panels (Minimum 180 Day No Sand Warranty), 4’ x 8’sheets, glued and mechanically fastened.
Truss/joist systems spaced over more than 19.2” o/c up to a maximum of 24” o/c require nominal 7/8” T & G CD Exposure 1 Plywood subfloor panels, (Exposure 1) 4’ x 8’ sheets, glued and mechanically fastened; or nominal 1” OSB subfloor panels (Minimum 180 Day No Sand Warranty), 4’x 8’ sheets, glued and mechanically fastened; or two layers of subflooring; or brace between truss/joists in accordance with the truss/joist manufacturer’s recommendations and with local building codes. Some truss/joist systems cannot be cross-braced and still maintain stability.
For double-layer subfloors, the first layer should consist of nominal 3/4” CD Exposure 1 Plywood subfloor panels (CDX), 4’ x 8’ sheets; or nominal 3/4” OSB subfloor panels (Minimum 180 Day No Sand Warranty), 4 x 8’ sheets. The second layer should consist of nominal 1/2” CD Exposure 1 Plywood subfloor panels, (Exposure 1) 4’ x 8’ sheets. The 1/2” plywood should be offset by 1/2 panel in each direction to the existing subflooring. The panels may also be laid on a diagonal or perpendicular angle, with 1/8” spacing between sheets. Nail on a 12” minimal grid pattern, using ring-shanked nails or staples.
Notes On Subfloor Panel Products
When situations arise that floor joists are changing direction, be sure the subfloor panels are interlocked to prevent a separation line where the plywood joins. As the home dries out and settles the plywood will separate leaving a large space that will show up between two rows of hardwood flooring.
If the slab is out of specification, consider grinding, floating or both. Many high spots can be removed by grinding; depressions can be filled with approved patching compounds; and slabs can also be flattened using self-levelling concrete products.
When sanding or grinding concrete, be sure to wear a mask. Apply water to the floor before sanding to limit dust.
Subfloor Must Be Dry: Refer to Chapter 6 (Moisture Testing)
Edge Glued Installation of Engineered Flooring (Floating with Pad)
Using approved glue, put a line not less than 1/16” and up to 1/8” diameter to the side and end grooves of the flooring installed over an approved pad. The floor will slightly move when walked on, especially if the floor is not perfectly level.
After installation, the floor can’t be disturbed for 48 hours; to allow the glue to set. Putting protective covering on the flooring will prevent the glue from curing, and prolong the drying period. If the floor is walked on before that time, the glue bond will be weakened; the boards will separate and possibly cause squeaks in the future. Squeaks are not covered under our warranty.
Pros of a Floating Engineered Installation
Installation is less expensive, as it takes less time and less glue is used.
Full Glue Down of Engineered Hardwood Flooring (with pad)
Approved pad is glued to the concrete using Gaylord-approved glue with the proper trowel to ensure a generous amount is applied.
Engineered flooring is glued to the pad using the proper trowel to ensure enough glue is used. Not using enough glue will prevent a good bond, and the area will be bouncy.
After installation, the floor can’t be disturbed for 48 hours; to allow the glue to set. Putting protective covering on the flooring will prevent the glue from curing, and prolong the drying period. If the floor is walked on before that time, the glue bond will be weakened; and the boards will be spongy
Pros of a Full Glue Down Engineered Installation
More solid feel and less possibility of squeaks.
Cons of a Full Glue Down Engineered Installation
More expensive to install because of more time and glue needed.
Board replacement, if necessary, takes more time.
It is difficult to keep glue off the surface of the boards. The installer can do a fantastic job keeping the floor free from glue, but often times other trades people and homeowners will step in the glue and track it throughout the house.
Upon failed jobsite conditions; Gaylord Hardwood Flooring will require a signed waiver form indicating failed conditions before proceeding with delivery and/or installation. Gaylord Hardwood Flooring accepts no responsibility for any future hardwood issues related to failed jobsite conditions (Chapter 4); product is properly acclimated (Chapter 5); moisture testing is complete (Chapter 6); and panel products/subflooring are prepared to proceed (Chapter 7).
Product can be installed above-grade or on-grade level on a wood-based subfloor.
Solid hardwood must be installed perpendicular to the joists or on a diagonal for any single layer subfloor. To run parallel to the floor joists, you must add a layer of 1/2” plywood underlayment or brace every 16” between the joists with a nominal 2” x 6” SPF nailed in place. Some joists systems cannot be cross braced and maintain stability.
Specific Hardwood Flooring Installation Requirements
If boards are 5” & wider please follow Wide Plank Solid & Engineered Nail Down Installation (discussed in Chapter 10). Please view our video on Installing Wide Plank Flooring https://youtu.be/YUYGiaV-PlM.
Approved moisture vapour retarder, overlapped 3” must be used. The purpose of an underlayment is to minimize the transfer of moisture from the subfloor to the wood flooring. This is especially important in new home construction where the subfloor is higher in moisture than the wood flooring.
If using a pneumatic nailer/stapler, the air pressure must be set so the fastener does not drive in too deep and crack the tongue.
Select a starting point according to the most aesthetically or architecturally important elements in the room, taking into consideration any stairways, hallways, fireplaces, doors, cabinets, adjoining tile and transitions; as well as the squareness of the room. The starting point will often be the longest unbroken line in the room. The use of spline allows you to start wherever you choose.
Because fasteners penetrate the tongue of the flooring at an angle, they act like tent pegs and resist a great deal of force in the direction the fastener enters the subfloor. For this reason, wood flooring has a tendency to expand mainly in the direction the tongue is facing. In rooms wider than 20 ft., this one-directional movement can cause a problem on the side of the room in which the flooring expands. Starting the installation in the center of large rooms can reduce these potential problems by forcing the expansion to go in two directions. Since the tongues on either side of the room face different ways, the floor will still expand the same amount, but instead of all the growth focusing on one side, half will go to the opposite side. This reduces the likelihood that there will be enough movement to cause cupping and cracking.
We recommend using 2” nails/staples, 1” to 2” from the board ends, and 6” to 8” apart with a minimum 2 nails/staples per piece. If boards are 5” & wider please follow Wide Plank Solid & Engineered Nail Down Installation. (Chapter 10) The Ontario Building Code requires nails to be used in all floors with a width of 3.5” or greater.
Allow 3/4” on the width and 1/4” on the length for expansion. Undercut drywall and use t-mould between the tile and hardwood when running widthwise (see Coefficients of Change).
Start with 4 or 5 boxes open and always keep at least 5 rows of flooring racked out ahead. To have the most aesthetically pleasing look rack the flooring so no joints are closer than 3 times the width of the pieces; avoid H joints and stair stepping from not completing rows.
Proceed with the installation until there is insufficient space to use the floor nailer. Remove your backer board. Glue the groove; insert the spline and fasten the piece with the floor nailer. Continue the installation in the other direction until there is insufficient space to use the floor nailer. To finish the last rows, treat them as in a floating floor installation by gluing the boards together at the tongue and groove; as well as brad nailing or hand nailing the boards in place. Never glue the last rows to the subfloor, as this prevents the hardwood floor from expanding. Face nail only the last row if it will be hidden by baseboard or quarter round (gluing the last rows together at the tongue and groove will keep them connected, enabling them to move with the rest of the floor through seasonal changes).
Once the boards are installed, they are considered to have been accepted by the installer and homeowner.
Solid Hardwood Flooring Installation Notes
After installation, use an approved protective cover to protect the floor. The entire floor should be covered, since some species are light-sensitive and uncovered areas may change colour. Use a covering material, with a vapor permeance (perm rating) of 1 perm or more (tested in accordance with ASTM E-96), to avoid trapping moisture/vapor on or within the floor. A common reinforced builder’s paper is a good choice. Using empty flooring boxes is not acceptable. Although the cardboard may prevent damage to the surface, it will attract and hold moisture on the floor, causing the boards to cup and crack. Any covering should be taped, using a low-adhesion tape (Blue 3M), to the base or shoe mouldings. Avoid taping to the finished flooring, as it may react and weaken the finish. The resin that prevents the tape from drying out can chemically react with the finish, causing it to come off when the tape is removed. When taping sheets, tape them to each other and not to the floor. Please watch our video discussing tape on flooring: https://youtu.be/7zblWe2oD-c.
Nail down installation of wide plank solid and wide plank engineered flooring requires additional bonding to the subfloor to prevent movement and squeaks. This is done by introducing glue to the nailing process. The installation method recommended is not a full glue down, but only a bead of glue across the width of the board. This is recommended on all wide plank solid and engineered floors 5” and wider, installed on a plywood or OSB subfloor.
Starting the install constitutes that you have accepted the Jobsite conditions (Chapter 4); product is properly acclimated (Chapter 5); moisture testing is complete (Chapter 6); and panel products/subflooring are prepared to proceed (Chapter 7).
Product can be installed above-grade or on-grade level on a wood-based subfloor.
The Method of Installing Wide Plank Flooring
Solid hardwood must be installed perpendicular to the joists or on a diagonal for any single layer subfloor. To run parallel to the floor joists, you must add a layer of 1/2” plywood underlayment or brace every 16” between the joists with a nominal 2” x 6” SPF nailed in place. Some joists systems cannot be cross braced and maintain stability.
Moisture vapour retarder running perpendicular to flooring leaving 1” between to allow for glue line. On 5” & 6” widths use full width (36”) approved vapour retarder. On boards 7” & wider cut vapour retarder in half (18”) which doubles the number of glue lines. Apply a 1/4-3/8” bead of glue on the subfloor between the vapour retarders. I would suggest not doing more than 3-4 rows worth of gluing to avoid the glue drying prematurely and it reduces the risk of tracking glue on the floor. If glue gets on floor clean it off as soon as possible. If you have minor width variations the wide planks this is normal and expected and part of the look of a wide plank floor. If heights of the boards are slightly different use small shims to pop up the lower pieces.
Starting the Installation with the Nailer/Stapler
If using a pneumatic nailer/stapler, the air pressure must be set so the fastener does not drive in too deep and crack the tongue.
Select a starting point according to the most aesthetically or architecturally important elements in the room, taking into consideration any stairways, hallways, fireplaces, doors, cabinets, adjoining tile and transitions; as well as the squareness of the room. The starting point will often be the longest unbroken line in the room. The use of spline allows you to start wherever you choose.
Because fasteners penetrate the tongue of the flooring at an angle, they act like tent pegs and resist a great deal of force in the direction the fastener enters the subfloor. For this reason, wood flooring has a tendency to expand mainly in the direction the tongue is facing. In rooms wider than 20 ft., this one-directional movement can cause a problem on the side of the room in which the flooring expands. Starting the installation in the center of large rooms can reduce these potential problems by forcing the expansion to go in two directions. Since the tongues on either side of the room face different ways, the floor will still expand the same amount, but instead of all the growth focusing on one side, half will go to the opposite side. This reduces the likelihood that there will be enough movement to cause cupping and cracking.
Use 2” nails, 1-2” from the board ends, and 4-6” apart with a minimum 4 nails per piece. The Ontario Building Code requires nails be used in all floors with a width of 4” or greater.
Allow 3/4” on the width and 1/4” on the length for expansion. Undercut drywall and use t-mould between the tile and hardwood when running widthwise (see Coefficients of Change). www.gaylordhardwoodflooring.com Rev 02.14
To have the most aesthetically pleasing look have no joints closer than 3 times the width of the pieces; avoid H Joints and stair stepping from not completing rows.
Proceed with the installation until there is insufficient space to use the floor nailer. Remove your backer board. Glue the groove; insert the spline and fasten the piece with the floor nailer. Continue the installation in the other direction until there is insufficient space to use the floor nailer. To finish the last rows, treat them as in a floating floor installation by gluing the boards together at the tongue and groove; as well as brad nailing or hand nailing the boards in place. Never glue the last rows to the subfloor, as this prevents the hardwood floor from expanding. Face nail only the last row if it will be hidden by baseboard or quarter round (gluing the last rows together at the tongue and groove will keep them connected, enabling them to move with the rest of the floor through seasonal changes).
Once the boards are installed, they are considered to have been accepted by the installer and homeowner.
Wide Plank Flooring Installation Summary
After installation, use an approved protective cover to protect the floor. The entire floor should be covered, since some species are light-sensitive and uncovered areas may change colour. Use a covering material with a vapor permeance (perm rating) of 1 perm or more (tested in accordance with ASTM E-96) to avoid trapping moisture/vapor on or within the floor. A common reinforced builder’s paper is a good choice. Using empty flooring boxes is not acceptable. Although the cardboard may prevent damage to the surface, it will attract and hold moisture on the floor, causing the boards to cup and crack. Any covering should be taped, using a low-adhesion tape (Blue 3M), to the base or shoe mouldings. Avoid taping to the finished flooring, as it may react and weaken the finish. The resin that prevents the tape from drying out can chemically react with the finish, causing it to come off when the tape is removed. When taping sheets, tape them to each other and not to the floor. To view a video on wide plank flooring installation, please follow this link: https://www.youtube.com/watch?v=YUYGiaV-PlM.
There are 4 types of radiant heating systems (steam radiators, hydronic (water), hot water baseboards and low voltage electric). If you are choosing our engineered hardwood floor it is very important that your heating contractor understand the maximum surface temperature of the flooring cannot exceed 25 degrees Celsius. Most species are not recommended over radiant heat. Our engineered hardwood is designed not to dry cup or delaminate. Dry cupping is when the solid wood layer shrinks when over-dried, forcing the substrate to follow. Ours will remain generally flat when dried but surface cracks in the wood layer appear as the top layer shrinks. Over-drying can be avoided by operating a humidifier that can keep your humidity between 35-55%. The assumption that engineered hardwood flooring is bullet proof is not accurate. We suggest choosing a rustic look with a matte finish. If a crack appears it becomes part of the rustic look. Choosing a dark colour with a shiny smooth finish is not recommended...
The Importance of a Professional
The system must be designed by a professional who can calculate how big the system should be as well as the best location for the manifold, so the hottest water leaving the system with a heavy concentration of piping is not under the hardwood flooring. In the planning stages, the manifold with the exiting hot water, with heavy concentration of piping, should be located where tile or some other floor covering is used. A professional can figure out the size of pex piping and the R value of what products are going over the radiant heat to create the most efficient system. It is recommended not to exceed the figure of 1.5 the accumulated total of flooring and subflooring to remain efficient.
Run your Radiant Heat System 7 Days prior to Flooring Installation
Whether it is concrete or joist heating, the system should be on and running for 7 days before installation can be considered; then moisture tests taken. Check for hot spots before installation commences. Covering floors with area rugs will create hot spots, which will raise temperature above maximum 25 degrees C causing over-drying of the engineered flooring.
Why Poor Quality Engineered Flooring will Cause Problems
These are pictures of poor quality engineered floors over radiant heat that have been exposed to either, overheated systems or large temperature swings. Unlike normal heating systems, radiant heat is steady; adjusting the temperature frequently is very hard on the wood and should be avoided. You should set your temperature and leave it.
Radiant Heat and Hardwood Flooring Summary
As shown above, wood is sensitive to temperature and moisture; poor quality products are more apt to experience severe failures. As mentioned earlier our product is not bullet proof, but it will fail much less than poorly manufactured products. It must be realized we are still dealing with a natural product and it is essential to follow our temperature and humidity guidelines. Additionally, the conditions the hardwood flooring enjoy are the same conditions for you to have a healthy body. As the chart on the following page demonstrates; what’s good for your floor is good for you.
What to consider when installing Exotic Hardwood Flooring
Exotic species are very beautiful; however they are very different than our domestic species in look, and require more care and patience when installing. Be sure to wear a dust mask and safety glasses when cutting pieces to avoid contact with dust, also wear gloves to prevent slivers as they are difficult to get out and will cause your hand to swell.
Exotics are very dense which makes them very difficult to mill; because of this, the milling tolerances are not as strict as our domestic species and slight width and thickness variations are normal. Not to mention that the wood is coming from a tropical climate in Brazil to our four season climate. Leaving a climate with a temperature of 38 C and 75% humidity and travelling 6000 km and arriving in Canada where the temperature could be -20 C with a humidity of 20% is quite a change to deal with.
The exotic species are up to 3 times harder than our domestic species. Quite often installers that have never worked with exotics call and tell us that the fastener is not going in properly or bending over. The same nailer and air pressure that works well on domestic woods will not suffice for exotic woods. When you get the fasteners going in the right depth be sure that there is not a dimple showing on the surface where the fastener went in. Due to the large amount of prefinished exotic floors being installed in North America, nailing equipment companies have developed new equipment; the latest product is an 18 gauge nailer using a 1.5” nail. When you have dark shiny floors with lots of light, it is very difficult to avoid the dimples from showing. Moisture conditions are very important. Exotics are very dense, making them stronger and stiffer, which puts more stress on the fastener when the wood swells.
Just as with light-sensitive domestic species such as cherry; exotic species will darken and nothing will prevent this from happening. Exposed to natural and artificial light; the change starts immediately. Avoid partially covering your floor with area rugs, as the floor around them will change. These colour changes make the floor more beautiful. If your customer has picked from a sample that has been aged, they must be forewarned that out of the box, the floor will not be aged like the sample. Moving furniture around will allow the floor to darken evenly; if you have a spot that has been covered, it will catch up with the rest of the floor given enough time. In exotics, huge colour variations are expected within the specie. If customers do not like variation, exotics should not be considered.
Exotic species can develop white spots months after the flooring has been installed. Lab testing has shown this is calcium carbonate, which naturally occurs in the wood. When finishing the wood we use sealers to prevent these spots from coming to the surface; and at time of production we cull the pieces with white spots; however, we can’t predict what pieces in the future will develop these spots.
We do not recommend engineered exotic flooring over radiant heat. Exposed to dry conditions, the surface layer will develop cracks. In general, exotics do not handle low humidity as well as our domestic species.
Although very beautiful, exotics are not suitable for all client. Professional installation is recommended. When getting quotes for installation, be sure to tell the installer you are choosing an exotic specie, and be sure that they have experience with that particular specie. If the installer has no experience with exotics, it would be a bad choice to use them.
Common Exotic Flooring Installation issues
Here are some of the most common reasons contractors get called back to the job site after installing exotics, and how to avoid them.
Cause: The exotic species are up to 3 times harder than our domestic species. Quite often installers that have never worked with exotics call and tell us that the fastener is not going in properly or bending over. The same nailer and air pressure that works well on domestic woods will not suffice. When you get the fasteners going in the right depth be sure that there is not a dimple showing on the surface where the fastener went in. Common species: Brazilian cherry/Jatoba, Tigerwood (shown), many others.
Cure: Because of the large amount of prefinished exotic floors being installed in North America the nailer companies have developed new equipment. The latest product is an 18 gauge nailer using a 1.5” nail. When you have dark shiny floors with lots of light, it is very difficult to avoid the dimples showing.
Cause: Just as with light-sensitive domestic species such as cherry, color change with exotics can be a problem in two ways. The most common stems from the floor changing color only in some areas due to part of the floor being covered, often with an area rug or piece of furniture. With some species that change color quickly, the color difference can even be a problem when the floor is covered temporarily on a job site. Complaints can also arise when the new floor out of the box is not the same colour as the aged sample they saw. Yet another problem with color change happens when most of the floor darkens except for an area of sapwood that stays a lighter color. Most woods darken with light exposure, but there are a few that lighten with exposure. Click this link to find out more about color change: https://www.youtube.com/watch?v=Y9Uu9tqkxuI
Common species: Brazilian Cherry/Jatoba, Tigerwood (shown), many others.
Cure: There's no way to prevent color change. Educate the customer when they are considering a species known to drastically change color. Provide them with samples showing what the species looks like new and after aging. After the fact, the best answer is to simply let the previously covered area "catch up" to the rest of the floor. If the customer can't wait that long, re-sanding is the only option (although in some severe cases, even re-sanding won't fix it). If a floor needs to be covered on a job site to protect it from other trades, be sure every square inch of the floor is covered. If customers won't accept the appearance of a single board, board replacement may be the only option.
Cause: White spots that appear over time—often months after the floor has been installed. Cure: Lab testing has shown that these spots are calcium carbonate. Although they are sometimes visible on the unfinished wood, other times there is no way to tell ahead of time where the white spots are going to occur. Like other wood grain characteristics, they are simply considered part of the species. At the factory, we pull out the white spots during production, but are unable to recognize the pieces that may develop these spots later.
Some contractors educate customers ahead of time about the spots, others simply hope they don't occur and still others just avoid installing species prone to the white spots.
Cause: Cause: Once the floor is installed or racked out, the client objects to the wide color variation of the boards. Cure: Be sure you show customers an accurate representation of the species, not just a small sample. Exotics can have a wide range of colours within the species. The customer needs to see the variations, and may like most variation but not all; so this must be communicated before installation.
Cause: Just as with many standard domestic species, moisture problems are an issue with exotics. But several factors can make exotics particularly tricky. They are extremely dense woods, making them stronger and stiffer, which puts more stress on fasteners when the woods swell. (These factors can also make the woods difficult to nail. Installers may tend to use fewer fasteners than they normally would, and tongues may tend to split.) Adding to potential moisture problems is the fact that most exotics originate in much more humid climates. When they are installed at much lower relative humidity than they will have over time, permanent gaps in the floor may appear.
Cure: Control humidity in the home to maintain humidity levels between 30- 50%.
Cause: Cause: Cracks appear on the surface of the pieces in both solid and engineered flooring during the heating season and close during the humid season. Our engineered flooring is sawn-face, which handles humidity changes quite well; but will crack. For this reason, we do not recommend exotics over radiant heating systems.
Heat Recovery Ventilation or HRV’s were introduced to the housing industry as new homes started being built with energy efficiency in mind. Being built very tight with no leakage, an air exchange system was needed to bring fresh air into the home. Previous building practices allowed fresh air into the homes through cracks and spaces making them more expensive to heat and cool, but allowed the new home moisture to escape much quicker. The air in older homes can change 1.5 times per hour with no need for additional equipment while in newly built homes the HRV changes the air 0.5 times per hour or one third of the time than older homes.
The HRV system exhausts stale air and replaces it with an equal amount of fresh air. The two streams of air are passed through the core of a heat exchanger, where heat from the exhausted air meets the cooler incoming air recovering 70-80% of the heat from the exhausted air. As you can see in the diagram there is no moisture added or removed by the system. The system is limited to exchanging and reheating the air. It is very energy efficient but does not have humidification or dehumidification capabilities.
Most homeowners feel the HRV system controls the humidity in the home, but this is not true. The controls are very misleading. When the dial is turned to 40%, home owners feel this is the relative humidity setting and they are creating the perfect conditions for the hardwood floor. In the heating season it is difficult to have the humidity in the home above 30% RH. Having the dial set at 40, the HRV will not come on until the humidity reaches 41% which will not provide the recommended 0.5 air changes per hour needed for a healthy home.
HRV’s should not be operated in the high humidity summer months as they just bring in the warm humid air, putting more stress on your air conditioning. Air conditioners remove moisture from the air only when they are operating. Air conditioners start and stop by temperature not humidity. Because of this the air conditioner does not replace a dehumidifier as the main source of moisture removal. If outside relative humidity is between 30-50% open your windows and enjoy the fresh air. In summer months the solution is to set a dehumidifier at 40% so it will come on only when needed.
In winter months, the colder outside air is drawn in by the HRV, and when heated the relative humidity drops substantially, far below our recommended low of 30%. Over use of the HRV in winter months allows too much dry air into the home causing hardwood flooring to shrink excessively, not to mention how unhealthy it is for humans and pets (please see chapter 2). The cure is simple; operate a humidifier that will maintain proper humidity levels.
If your home is under construction I would seriously consider upgrading your HVAC system to include a dehumidifier and a humidifier.
Heat Recovery Ventilator Information Summary
HRVs do not add or take away moisture
Don’t operate HRVs in the humid months
Air conditioners only remove moisture when running
Dehumidifiers and humidifiers are controlled methods of reducing and adding humidity
Hardwood flooring and humans enjoy the benefits of humidity levels between 30-50%
Following our installation guidelines, quickly removing the excess moisture in the new home, and keeping the long term relative humidity as close to 40% as possible, will greatly reduce your chance of call-backs. However some customers have unreal expectations.
Wood is a natural product and is infinitely variable, with no two pieces alike. Hardwood flooring is manufactured in accordance with accepted industry standards that permit a defect tolerance not exceeding 5%.
Wood is a hygroscopic material. This means when exposed to air it will pick up or lose moisture. Moisture loss causes wood to shrink; moisture absorption will cause wood to swell. Wood will not shrink or swell equally in all directions. It is normal to have large spaces between boards above heating systems and heat duct runs. Wider widths will shrink and expand more per piece than narrow ones. It is normal in the dry heating season to have spaces between boards the thickness of a dime (1/32”) in 2 ¼” wide flooring. Tarion guidelines state that seasonal spaces between boards cannot exceed 2mm, which is the thickness of a toonie...
Many customers have undersized humidifiers and dehumidifiers that will not keep the relative humidity in the recommended range, but feel they are following the guidelines. Many homeowners believe that an HRV is a magical machine that automatically controls the humidity in their home. Unfortunately it will not control the humidity at this time. An HRV is only an air exchanger; it removes stale air from inside the home and exchanges it with fresh air from outside the home. In winter months it will bring in dry air from outside so interior humidification is necessary. In the summer months it will bring in humid air so it must be turned off. If not used properly your HRV can actually be harmful causing damage to your floor (excessive drying or absorbing excessive moisture).
New floors will have a snap, crackle and pop sound when walked across. When walking back over the same boards the sound is gone. This is more prevalent near larger windows where the sun comes in and is totally normal.
All imperfections must be visible from a standing position in any light. It is unreasonable when homeowners tell you to come at 3pm on a sunny day as that is the only time the blemish is visible or get on their hands and knees with a 5,000,000 candle power flashlight.
Dark shiny floors are more prone to call backs, especially dark stains on light colored wood. When the flooring shrinks during the heating season the light-coloured wood on the tongue shows through giving a striped look. Although very stylish, the slightest scratch or dent will be noticeable and should be mentioned during the selection phase. This is not a good choice for clients with pets; young children; and people who will not control humidity.
Occasional squeaks and creaks are normal especially in high traffic areas. They can come and go as the seasons change.
The sun will change the colour of the floors; do not cover the floors with area rugs, etc. for the first year.To watch our video on this, please click the following link https://youtu.be/Y9Uu9tqkxuI.
FINISHING THE BASEMENT CEILING BEFORE THE SUBFLOOR MOISTURE CONTENT IS WITHIN 2% OF THE HARDWOOD WILL CAUSE THE HARDWOOD TO CUP AND REMAIN CUPPED FOR 3 YEARS OR LONGER. There is no airflow, which is needed to pick up and remove this moisture. The trapped moisture in the joists and subfloor migrate to the hardwood.
Our finish is 2 to 3 times as thick as most of our competitors. It also has a high content of solid titanium oxide particles, which gives us a finish we can warranty for 40 years, but has less elasticity in it making it more important to get the new home moisture removed as soon as possible.
Cause: Flooring absorbing excessive moisture on underside, causing expansion with raised edges. / Not leaving enough expansion space around perimeter. / Flooring has nowhere to go but up. / Cupping is very common in newly built homes. / Develops gradually and cause boards to crack and split. / Finishing the ceiling in basement traps moisture, which is absorbed by hardwood floor; prolonging the time flooring will remain cupped.
Cure: Run a commercial dehumidifier in the basement with fans blowing air towards it. It is very important to place the dehumidifier in the basement, as it will pull the moisture down from the sub-floor, minimizing the long-term damage (cracks, splits). If the dehumidifier is placed upstairs, the sub-floor moisture will be drawn through the hardwood, causing cracks and splits.
Cause: Trades people careless with tools. / Moving furniture and appliances. Cure: Use a touch-up marker to make the scratches less visible / Adhere felt pads on furniture legs / Replace heavily damaged boards / deal with the trades people who are causing the damage.
Cause: During the heating season, the air is dry and the wood gives up some of its moisture and shrinks. These spaces are larger in the area above the heating system and along the heat duct runs. Cure: Run a humidifier to add moisture into the environment or wrap your heat ducts with insulation.
Cause: Wood is a natural product and when it is exposed to conditions outside of the recommended 30-50% relative humidity, it can crack and split. Cure: Replace the damaged boards / Use putty, stain, and topcoat / Live with the cracks and splits.
Cause: Excessive water left on or below the surface of the flooring for extended periods of time. The finish becomes wrinkled on the edges, end, and surface. The finish can peel. The damage can be caused by water coolers, icemakers, pet dishes, dishwashers, toilet overflows, leaky hoses on washing machines in adjacent rooms; plumbing leaks, etc. Severe water damage will buckle the floor.
Cure: Replace or patch the damaged boards / Remove the damaged boards; allow area to completely dry before installing new boards.
Cause: The hardwood pulls away from the sub-floor, rising up several inches in one or more areas. This is the most extreme reaction to moisture; usually caused by a moisture leak. Cure: Locate and repair the leak. Remove the damaged boards; allow area to completely dry before installing new boards.
Cause:Floor joists have changed direction and plywood has not been overlapped. Wood floor joists shrink, but interior steel beams and jackposts do not. When settling occurs, the floor settles (lowers) on wood joists, but remains higher over the steel joists/jackposts. This causes large gaps between the rows of flooring that are over the steel beams/jackposts. Cure: Customize a wider board to fill the gapped space.
Cause: Fasteners have let go from the subfloor. / Subfloor has too much flex. / Not enough fasteners used. / Overdrawn fasteners have cracked the tongue; allowing movement. / Cluster joints. / Loose connection between the subfloor and the joists. / Boards have shrunk, allowing the wood to move. Cure: Glue injection / Live with the squeaks / Secure subfloor to the wood joists with glue and screws.
Ensure bottom of circular saw does not have any rough spots or “burrs” because that may cause damage to adjacent boards. If the bottom of the circular saw is rough, attach painters tape to protect the flooring.
Step 2
Set saw blade to the proper depth for the thickness of your hardwood floor. This would be ¾” for all Gaylord Hardwood Flooring products.
Step 3
Cut a line ½” to 1” from the edge of the board along the entire length of the board.
Step 4
Cut a line ½” to 1” from the edge of the board on the opposite side along the entire length of the board.
Step 5
Cut across the center of the board on a 45 degree angle until you have reached both parallel cut lines.
*Note: These cuts will produce a large amount of saw dust. It is advisable to have someone follow along your cuts with a vacuum to capture as much saw dust as possible.
Step 6
Using a hammer and chisel, remove the middle section of the board, then chisel out and remove the sections along the edges of the board.
*Note: Be very careful not to damage adjacent boards.
Step 7
Remove Nails/Staples with pliers.
Step 8
Cut and remove underlay to expose plywood. Vacuum the hole to ensure it is free of sawdust and debris.
Step 9
Select a suitable board and cut it to the proper length to fit in the hole, keeping the end of the board with the groove.
Note: Ensure the board is from the same batch of flooring for a proper match. The piece must match in stain colour, grain, sheen, as well as the amount of variation in wood throughout the rest of the floor.
Step 10
Remove the bottom of the groove at the end and along the sides of the board using a table saw.
Step 11
Dry fit the board in to place by putting the tongue of the new board into the groove of the adjacent board and setting it into place to ensure the board fits.
Step 12
Replicate the bevelled edges on the cut end of the board using a sanding block. When the right size bevel has been achieved, stain the newly made bevel with a matching stain pen or stain.
Step 13
Apply an ample amount of urethane based adhesive to the exposed subfloor, but not too much that the adhesive comes out of the edges when compressed.
Note: Wipe off any excess urethane based adhesive immediately. If allowed to cure, it will be virtually impossible to remove.
Step 14
Place the tongue of the replacement board into the exposed groove of the adjacent board and drop into place. Use a rubber mallet to tape the board into place and ensure it is flush with the adjacent boards.
Step 15
Place scrap pieces of hardwood flooring across the width of the board with the finished face down, ensuring the replaced board is flush with the adjacent boards.
Step 16
Add weight to the boards and leave it for 24 hours to allow the adhesive to cure.
*Note: This step is extremely important. As urethane based adhesive cures, it expands, which can push the replaced board up, causing it not to be flush with adjacent boards.
Cleaning Your Hardwood Flooring - Bona VS. Water & Vinegar
How to Clean your Hardwood Flooring
Prefinished hardwood floors are very durable and easy to maintain, however they are not indestructible. As the homeowner, it is your responsibility to care for and maintain your hardwood flooring. If you follow our guidelines, your hardwood floor will look beautiful for a lifetime.
Before Move-In
Relative humidity must be maintained between 30-50%
Ensure floor is clean before moving in, so small pebbles and debris don’t scratch the floor
Install felt pads on all furniture. Sharp edges on furniture can scratch and damage flooring. We recommend Flexi-Felt (www.flexifelt.com)
Use extreme caution when moving appliances. The wheels on the bottom of stoves and refridgerators will dent your hardwood flooring. We recommend a product called “Glide Guard” to protect your flooring when moving appliances.
Office chairs can be very damaging to your hardwood flooring. Grit and dirt that build up on the caster wheels is very abrasive and will wear off the finish on your hardwood flooring. A plastic mat on your hardwood floor can be equally damaging. They can trap dirt and moisture on the surface causing damage to the flooring and the finish.
Regular Maintenance of Hardwood Flooring
Dust or vacuum your hardwood flooring regularly and do not use any household dust treatments
If something is spilled on the floor, be sure to wipe it up immediately.
Clean floor only when necessary and/or only in soiled areas. Do not “over clean” your hardwood floor
Cleaning Hardwood Flooring
The only cleaning product we recommend is Bona. Cleaning products with a large amount of soap will leave a residue on your hardwood floor, and will eventually make it appear cloudy and not clean. Using water on your hardwood flooring will also leave a film because the water will settle and dry on the surface of the hardwood floor. The water can also cause damage to the finish on the hardwood flooring because the water is absorbed by the wood flooring which causes the finish to check and crack. Never use Murphy’s Oil Soap, water, or a steam mop on your hardwood flooring.
Step 1
Vacuum or sweep your hardwood flooring to remove debris and other solid particles from the floor’s surface. If necessary, dry mop hardwood flooring to remove any excess dust not picked up by the sweeping.
Step 2
Spray floor with Bona spray cleaner and spread on the hardwood floor with the mop.
Step 3
Before Bona solution is dry, place two layers of paper towel between the mop and the hardwood flooring. Buff the flooring until dry, this will remove excess film from the hardwood flooring
We are often asked if we carry bamboo flooring. Of course, we do not. A lot of people have the misconception that bamboo flooring is the most environmentally friendly flooring option when in fact, it is actually the opposite. The majority of marketing for bamboo flooring is based solely around this fallacy, but is very convincing to the average consumer who wants to go “green.”
Here is a walk through comparison of the three main manufacturing steps of both bamboo and Canadian made hardwood flooring. It will help you decide for yourself which option is better for the environment.
The Manufacturing Process of Bamboo Flooring
The first step in the process is the harvesting of the raw material and this in essence is where bamboo earns its reputation as the “green” alternative to solid wood. Bamboo can grow up to 2 feet in a single day. Compare this to hardwood trees which take between 40 and 60 years to fully mature. In this case bamboo does seem to be the “greenest” option. Although it takes hardwood trees far longer to mature, the growth in our forests is far greater than the removals. The trees that are sprouting today will not be needed for over 100 years. Contrary to popular belief, hardwood forests in North America are harvested very sustainably. The “clear cutting” you see on the news is done in softwood forests like pine and spruce. The mature trees in the forests are marked with spray paint by either the logger themselves or someone from the ministry of natural resources and these are the only trees to be cut down. This practice provides light for the smaller trees so they can one day reach their maturity. Standing hardwood volume in North America is currently 328 billion cubic feet, which is an increase of 90% since 1953. One of our lumber suppliers, Chisholm lumber owns thousands of acres and have been harvesting that same land since 1857.
The second step is the actual manufacturing process. Bamboo must be cut into lengths, ripped into thin strips, laminated together with formaldehyde based glue, milled into a tongue and groove, and then finished. All of this is done with no regulations on the plant, glue, finish, or waste. Not to mention, 80% of the electricity for these plants is generated from coal. This process is pretty complex when compared with the manufacturing process of hardwood flooring. The logs are sawn into lumber, the lumber is milled into flooring, and then a 0% Voc finish is applied. Flooring takes less water and energy to produce than any other flooring option. The only by product is sawdust which can be used as bedding for horses or made into wood pellets. Waste from the manufacturing of bamboo flooring can be very toxic and is sent to landfills or dumped illegally.
The Impacts of Shipping on the Environment and Bamboo Flooring
Finally, we come to the last step in the process, shipping. For most products, the biggest impact on the environment is from shipping. The environmental impact of shipping Canadian made hardwood flooring in Canada is very minimal, but the impact of bamboo is huge. Bamboo is shipped across the ocean in huge container ships. These ships use a regular grade diesel when near ports or other regulated waters, but when they are in international waters they burn a far lower grade of diesel that is cheaper and causes far more pollution. According to the UK newspaper The Guardian and other sources; 15 of the world’s largest container ships pollute more than all of the automobiles in the world. To put this in a more local perspective, one container ship coming from Shanghai to Montreal will pollute more than all of the registered automobiles in Canada driving 70,000 kilometers.
To truly recognize how “green” a product is, you must take the entire life cycle of that product into consideration. Bamboo flooring is fairly new to the market and hasn’t proven itself to be a good long term option. It is quite possible in a few years it will be taking up space in our landfills like carpet, vinyl, and laminate flooring are. In European castles like Versailles, you will see hardwood floors that have been installed for hundreds of years. Hardwood flooring should never end up in a landfill, and at the very least if you decide to tear up your flooring, it can be burned as fuel.
We are often asked by clients if they can install hardwood flooring in their kitchen. The answer is yes. The majority of new homes built are open concept and the kitchen is part of a large open space. It can be unnatural to install a different flooring product in the kitchen, and in some cases it may be a tripping hazard where the two floors aren’t the exact same height. Hardwood flooring is much more comfortable to walk on and warmer than ceramic tile.
Obviously, water damage is a concern with flooring in the kitchen. Your everyday spills shouldn’t cause any issues, but you will want to wipe them up right away. There are potential scenarios where your wood floor can be damaged in a kitchen. We had clients that were away in Florida for the winter and their dishwasher leaked. However, this would cause damage on any floor covering. This scenario is something that rarely happens. Overall, the natural, flowing look of hardwood flooring in your home, and through your kitchen outweighs the potential for damage. Mark Twain said it best when he said “I’ve had a lot of worries in my life, most of which has never happened.”
Clients often ask us whether prefinished or unfinished flooring is better. I would typically only recommend site finished flooring if you are trying to match an existing site finished floor and are refinishing the entire area. We do not recommend it for boards over 2-1/4” wide.
There is a misconception that site finished flooring is completely sealed and will not move. The fact is, wood will shrink and expand with changes in humidity, and gaps in a site finished floor are far more noticeable than prefinished. When site finished flooring shrinks in the winter, the gaps that develop will crack the finish, which is especially the case in wider boards.
Also, since the boards in a site finished floor are stuck together by the finish the gaps will develop at the weakest point in the finish which may be every 3- 4 boards. This is called “side bonding” and doesn’t occur in prefinished floors. In a prefinished floor the boards are free to shrink individually so you have small gaps between each board, rather than large gaps randomly throughout your floor.
You love the look of hardwood floors, but you have a dog. Hardwood flooring is out of the question, right? Luckily, that’s not the case. Your pet can live in harmony with your hardwood flooring. You just have to be sure to select a hardwood floor that will be pet friendly.
The hardness of the actual wood you are using for your hardwood flooring is very important. Harder wood species will be less likely to dent and scratch than softer woods. Some wood species to avoid would be North American walnut and cherry. Hardness of the wood alone isn’t the only factor to consider when choosing a pet friendly hardwood floor. No matter how hard the wood, it will still dent and scratch. In addition to hardness, there are several other factors to consider.
Choose a Rustic Hardwood Floor for your Pet
It is inevitable that your hardwood floor is going to get damaged with normal wear and tear. The key is to choose a rustic hardwood floor, so those dents and scratches will add to the character of the floor. On a perfect floor, especially a dark hardwood floor; dents and scratches will be more noticeable and will look like defects and take away from the overall appearance of the hardwood flooring.
Opt for a Lower Sheen Finish
A glossy finish will magnify each and every dent and scratch in your hardwood floor. Although lower sheen finishes don’t eliminate dents and scratches, it will make them less noticeable. This higher the sheen level, the more this damage will be magnified in your floor, this is especially the case with dark shiny floors.
In addition to a lower sheen finish, we also offer specialty finishing options that will make your hardwood flooring very pet friendly.
Opt for a Distressed Hardwood Flooring Finish
Before the flooring is stained and finished, it runs through a large wire brush. This wire brush tears out the softer fibres in the wood providing a more textured surface. The combination of removing the softer wood fibres and the texture makes this hardwood flooring extremely durable and low maintenance. The wire brushing really helps display the unique patterns and medullary rays found in quarter sawn and live sawn oak. We only finish the distressed in our Matte finish. Finishing the distressed in a higher sheen makes it look like plastic. The distressed is very versatile, because depending on the stain colour and grade of flooring, it can work in any setting. The best part about the distressed finish is that it is already textured so dents and scratches only add to the look of the floor.
Opt for a Two-Pass Flooring Finish
The two-pass finish is very unique. All of the boards are stained entirely black and then refinished and stained a different colour. This provides and incredible rustic look which is especially popular in wide plank floors. On species with very little grain like maple, the two-pass mostly just turns the bevels of the boards black, which really showcases the board’s width. On species with grain like oak and hickory, the black stain also highlights the grain patterns in the wood by turning it black. On our live sawn white oak, the two-pass finish does an incredible job of bringing out the unique grain features like the medullary rays. On two-pass floors we also offer the option of having “nail holes” put in your flooring. Before we stain the wood black, we hit the surface randomly with a pin hammer. These marks soak in the black stain giving the appearance of nail holes or worm holes. The two-pass can also be done with a white base instead of black like in our champagne and beach sand floors.
Although dark floors are very popular and stylish, they aren’t the most practical option for a busy family. Dark floors show dust and dents and are very difficult to keep clean. Checks and cracks which are a natural characteristic of wood are magnified on a dark floor, especially one with a high gloss. Even the slightest irregularity in the subfloor will be displayed in the hardwood flooring when the sunlight hits a dark floor at the right angle.
Since dark floors show so much more dust, the tendency for homeowners is to “over clean” their floors. Doing this causes a build-up of cleaning residue which will leave a film on the floor. Even good hardwood floor cleaners that claim they do not leave a residue will if the floor is cleaned too much. You should limit your cleaning to once a week and use paper towel to buff the floor when a film is noticed on the floor. Small dents and scratches that don’t penetrate the finish are very noticeable and nothing can be done to repair them other than replacing the entire board.
Even when the dent or scratch penetrates the finish and a repair can be done, no matter what is done the repair will still stick out like a sore thumb. The repaired area will typically have a lower gloss so it will be just as noticeable as it was prior to the repair taking place.
One thing our company is known for is our long board lengths. Our standard hardwood flooring comes in lengths up to 8 feet and our wide plank and engineered flooring comes in lengths up to 10 feet. If you compare our flooring to most quality North American hardwood flooring manufacturers, you will find our average board lengths are almost double industry norms.
We bought boxes of red oak flooring from 4 of the largest North American hardwood flooring manufacturers and found the average board lengths for each to be somewhere between 27 to 29 inches. The average board length in our red oak is 48-54”. This is a significant difference. Longer lengths provide more visual continuity and a nicer look, whereas short boards look very choppy.
The reason for our long board lengths is quite simple. We use better lumber.
At Gaylord Hardwood Flooring we offer three different sheen levels. All of which offer different benefits and drawbacks. The key is to find the most suitable one for your home and lifestyle. All three of these finishes are the same durability but the lower the sheen, the less light is reflected across the floor. This reflection is what shows dents, scratches, and dust. You must keep in mind how much light you have in your home and exactly what look you are trying to achieve. In a home with a lot of natural light you may want to opt for a lower gloss and vice versa.
Semi-Gloss Flooring Finish (50% Sheen)
The semi-gloss provides a classic look that many clients are expecting in a prefinished hardwood floor. The sheen level is high enough that it provides a nice warm sparkle but not too high that it looks like plastic. Since it is our shiniest finish, it will also be the highest maintenance. Dents, scratches, and dust will be magnified across the surface, and it will require regular cleaning.
The semi-gloss finish is very popular on red oak and works well in traditional settings.
Satin Flooring Finish (25% Sheen)
The satin finish is a popular sheen level because it still provides some shine to a floor but will be much lower maintenance than the semi-gloss finish. We used to call the satin finish our “Dog Finish” because at that time it was the lowest sheen level we offered making it the most pet friendly. This finish is popular on any wood and is suitable in a rustic or formal setting.
Matte Flooring Finish (10-13% Sheen)
The matte finish is the lowest sheen level we offer. It is meant to look similar to a low sheen “Oiled” floor but with far less maintenance. There is very little light reflected on this floor, so dents, scratches, and dust will be hidden. This is the gloss level we typically put on our most rustic floors. It can also work in a traditional or modern environment where the homeowner would like a lower maintenance hardwood flooring option. Matte finish is the best options for a busy house hold with children and pets. In addition to the three different sheen options, we also offer some unique finishes to give your hardwood floor a more unique look and feel.
Distressed (Wire Brushed) Flooring Finish
Before the flooring is stained and finished, it runs through a large wire brush. This wire brush tears out the softer fibres in the wood providing a more textured surface. The combination of removing the softer wood fibres and the texture makes this hardwood flooring extremely durable and low maintenance. The wire brushing really helps display the unique patterns and medullary rays found in quarter sawn and live sawn oak. We only finish the distressed in our Matte finish. Finishing the distressed in a higher sheen makes it look like plastic. The distressed is very versatile, because depending on the stain colour and grade of flooring, it can work in any setting. The best part about the distressed finish is that it is already textured so dents and scratches only add to the look of the floor.
Two-Pass Flooring Finish
The two-pass finish is very unique. All of the boards are stained entirely black and then refinished and stained a different colour. This provides and incredible rustic look which is especially popular in wide plank floors. On species with very little grain like maple, the two-pass mostly just turns the bevels of the boards black which really showcases the boards width. On species with grain like red oak and hickory, the black stain also highlights the grain patterns in the wood by turning it black. On our live sawn white oak, the two-pass finish does an incredible job of bringing out the unique grain features like the medullary rays. On two-pass floors we also offer the option of having “nail holes” put in your flooring. Before we stain the wood black, we hit the surface randomly with a pin hammer. These marks soak in the black stain giving the appearance of nail holes or worm holes. The two-pass can also be done with a white base instead of black like in our champagne and beach sand floors.
All natural hardwood floors will change colour slightly over time. Some woods will change significantly based on that species photosensitivity. These hardwood floors typically take between six months to two years to reach their mature colour depending on the specie of wood and the amount of natural or artificial light the flooring is exposed to. Some wood species become darker and some become lighter over time.
Exotic Wood Floors Darken
Most exotic wood species like Jatoba, Tigerwood, and Cumaru will darken over time. This also occurs in North American Cherry. When selecting one of these floors you must make sure you are choosing it based on the mature colour and not the colour it is when it comes out of the box. When these floors are first installed, they are much lighter but it will deepen over time to the rich colour you based your selections on.
Depending on the amount of light the hardwood floor is exposed to, all natural wood floors will change colour. Even though manufacturers use UV cured finishes that reduce amount of discolouration and yellowing, the wood itself will still change. Natural maple, ash, and hickory will typically lose their snowy white colour and begin to yellow with exposure to light. North American walnut is unique, because it is one of the only wood species that will become lighter with exposure to natural and artificial light.
Color change can be expected on certain species
All of these colour changes are normal and to be expected. We recommend not using area rugs, or moving them around periodically in the first two years. This allows the flooring to mature in colour evenly throughout the entire space. For more information on which wood species change colour and how, feel free to contact us at info@gaylordhardwoodflooring.com or 877-333-0433